Logitech Media Server with Raspberry Pi 3 B+ and 3.2″ TFT Display

My enthusiasm for the Squeezebox ecosystem began several years ago. I bought my first Squeezebox in 2005. It was a Squeezebox2 with a very easy to read vacuum fluorescent display and great sound thanks to a high quality digital to analog converter. At that time the company was called Slim Devices, but was taken over by Logitech in 2006. Some more very interesting devices followed, but in 2012 Logitech unfortunately stopped the production of the Squeezeboxes. Since then, you can only buy second-hand devices or you build your own device. I have remained loyal to the system to this day, as I have not yet found anything comparable that is so practical and flexible.

The Logitech Media Server, formerly also called SlimServer, SqueezeCenter or Squeezebox Server, is the heart of the Squeezebox ecosystem. Since it was open-sourced by Slim Devices from the beginning, the software is still being developed today. My server has been running smoothly on a Raspberry Pi 3 B+ for several years now. Now a good friend of mine also wants to install a small Squeezebox server, which gave me the idea to write a small manual for it.

Hardware

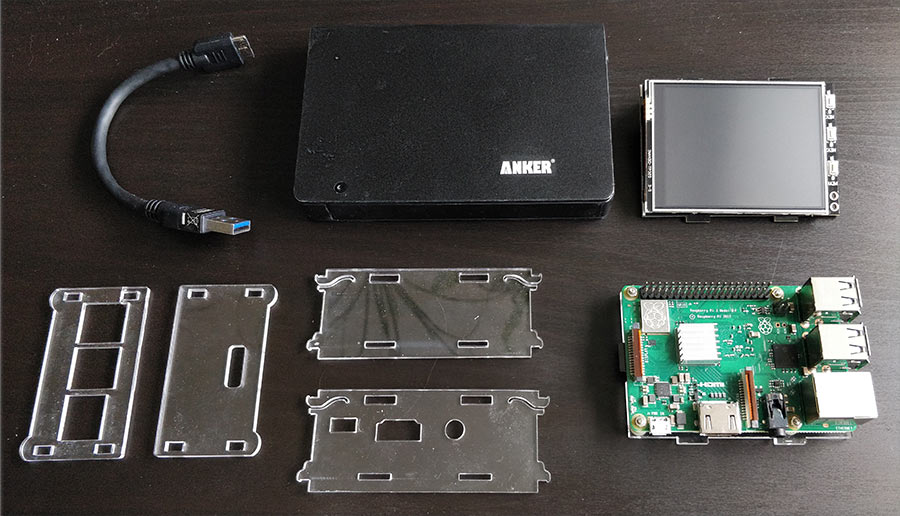
For a Logitech media server, there are basically not very many components necessary, some of which might even be lying around unused somewhere. Therefore, the list is not very long. The display isn't really necessary, it's just a little gimmick:

  • Raspberry Pi 3 B+ with suitable power supply unit
  • microSD card, 8GB or larger
  • external USB disk, size depending on the size of the music collection
  • Waveshare 3.2" TFT Display
  • Joy-it 3.2" display case

Bauteile für Logitech Media Server

The display is simply plugged into the GPIO ports of the Raspberry and then the case is put together. The whole thing takes less than 5 minutes. There are also instructions for the case on the JOY-IT website.

Installation Raspberry Pi OS

The next step is to install the operating system of the Raspberry Pi. For the Logitech Media Server the Raspberry Pi OS Lite would be sufficient. But since I will install a system monitor that needs the desktop, I need the Raspberry Pi OS with desktop. The easiest way to install it is with the Raspberry Pi Imager. The current version is Debian Buster.

Raspberry Pi Imager

After the operating system is written to the SD card, the card must be prepared so that the Raspberry can connect to the WLAN and access (easiest with PuTTY) via SSH is possible. To do this, remove the card briefly and insert it back into the PC. Now a new drive with the /boot partition of the SD card should be available.

To configure the WLAN, a file named wpa_supplicant.conf with the following content is copied to the card. The fields for the country, SSID and password must be adjusted accordingly.

country=XX
ctrl_interface=DIR=/var/run/wpa_supplicant GROUP=netdev
update_config=1
network={
       ssid="WLAN_NAME"
       psk="WLAN_PASSWORT"
       key_mgmt=WPA-PSK
}

For SSH access only an empty file with the name ssh has to be copied to the card.

Now the SD card can be inserted into the Raspberry Pi and the computer can be booted. After the boot process you can check at the router if the Raspberry has started correctly and which IP address it has. It appears in the list of connections under the name raspberrypi. Then you can login via SSH on the Raspberry with the default login pi/raspberry.

It is recommended to change the default password first and then update the system with the commands

sudo apt-get update
sudo apt-get upgrade

This may take a few minutes. Finally set the timezone to the appropriate value. In my case this is

sudo timedatectl set-timezone Europe/Vienna

The list of available time zones is located in the /usr/share/zoneinfo directory.

Display driver

The display driver is installed with the following commands:

git clone https://github.com/waveshare/LCD-show.git
cd LCD-show
chmod +x LCD32-show
sudo ./LCD32-show

At the end the Raspberry reboots and should look like this:

Raspberry Pi Desktop

Optimizations

First, the hostname of the Raspberry is changed:

sudo hostname -b SqueezeboxServer
sudo hostnamectl set-hostname SqueezeboxServer
sudo reboot

After that, the computer should also be shown on the router under the name SqueezeboxServer.

The following are some changes to extend the life of the SD card by reducing write accesses. First, swapping is disabled:

sudo service dphys-swapfile stop
sudo systemctl disable dphys-swapfile
sudo apt-get purge dphys-swapfile

Afterwards another entry is made in /boot/cmdline.txt. The editor is started with

sudo nano /boot/cmdline.txt

At the end of the line the option noswap is added. The whole line then looks like this:

dwc_otg.lpm_enable=0 console=ttyAMA0,115200 console=tty1 root=/dev/mmcblk0p2 rootfstype=ext4 elevator=deadline rootwait fbcon=map:10 fbcon=font:ProFont6x11 logo.nologo noswap

To prevent log files from being written to the SD card, temporary directories can be moved to RAM. To do this, the file /etc/fstab is modified with

sudo nano /etc/fstab

and should look like this:

proc            /proc           proc    defaults          0       0
PARTUUID=afd7b074-01  /boot           vfat    defaults,noatime  0       2
PARTUUID=afd7b074-02  /               ext4    defaults,noatime  0       1

# Log to RAM
tmpfs   /tmp            tmpfs   defaults,noatime,nosuid,mode=1777,size=256m 0 0
tmpfs   /var/log        tmpfs   defaults,noatime,nosuid,mode=0755,size=128m 0 0
tmpfs   /var/tmp        tmpfs   defaults,noatime,nosuid,mode=0755,size=128m 0 0

# a swapfile is not a swap partition, no line here
#   use  dphys-swapfile swap[on|off]  for that

After a reboot, the adjustments can be checked with the command

df -h

The result should look something like the following:

pi@SqueezeboxServer:~ $ df -h
Filesystem      Size  Used Avail Use% Mounted on
/dev/root        29G  3.2G   25G  12% /
devtmpfs        430M     0  430M   0% /dev
tmpfs           463M     0  463M   0% /dev/shm
tmpfs           463M  6.3M  456M   2% /run
tmpfs           5.0M  4.0K  5.0M   1% /run/lock
tmpfs           463M     0  463M   0% /sys/fs/cgroup
tmpfs           128M     0  128M   0% /var/tmp
tmpfs           256M  4.0K  256M   1% /tmp
tmpfs           128M  216K  128M   1% /var/log
/dev/mmcblk0p1  253M   48M  205M  19% /boot
tmpfs            93M  4.0K   93M   1% /run/user/1000

Mount external hard disk

The external hard disk should be mounted automatically in a defined directory. As file system I use exFAT, so that files larger than 4GB can be stored. First the directory is created and necessary packages are installed:

sudo mkdir /media/usb-drive
sudo chown pi:pi /media/usb-drive/
sudo apt-get install exfat-fuse
sudo apt-get install exfat-utils

Now the external USB hard disk is connected. With the command

sudo blkid

the available partitions are displayed. The list looks like this, for example:

/dev/mmcblk0p1: LABEL_FATBOOT="boot" LABEL="boot" UUID="7616-4FD8" TYPE="vfat" PARTUUID="afd7b074-01"
/dev/mmcblk0p2: LABEL="rootfs" UUID="87b585d1-84c3-486a-8f3d-77cf16f84f30" TYPE="ext4" PARTUUID="afd7b074-02"
/dev/mmcblk0: PTUUID="afd7b074" PTTYPE="dos"
/dev/sda1: LABEL="Music" UUID="9292-2EB8" TYPE="exfat" PARTUUID="eefca9f3-01"

The last line shows the external hard disk. For mounting now the UUID is needed, in this case 9292-2EB8. Now again the file /etc/fstab is created with

sudo nano /etc/fstab

and insert the entry for this external harddisk. The file looks like this:

proc            /proc           proc    defaults          0       0
PARTUUID=afd7b074-01  /boot           vfat    defaults,noatime  0       2
PARTUUID=afd7b074-02  /               ext4    defaults,noatime  0       1

# Musik Disk
UUID=9292-2EB8 /media/usb-drive exfat utf8,uid=pi,gid=pi,noatime 0

# Log to RAM
tmpfs   /tmp            tmpfs   defaults,noatime,nosuid,mode=1777,size=256m 0 0
tmpfs   /var/log        tmpfs   defaults,noatime,nosuid,mode=0755,size=128m 0 0
tmpfs   /var/tmp        tmpfs   defaults,noatime,nosuid,mode=0755,size=128m 0 0

# a swapfile is not a swap partition, no line here
#   use  dphys-swapfile swap[on|off]  for that

After a reboot, the external hard drive should now be available under /media/usb-drive.

Set up Samba share

In order to conveniently copy the music files to the Squeezebox server from the PC, it is helpful to create a shared folder with Samba. To do this, the Samba package must first be installed. The question about the WINS server can be answered with No.

sudo apt-get install samba

After that, the shared folder is configured in the /etc/samba/smb.conf file:

sudo nano /etc/samba/smb.conf

The following configuration is added to the end of the file:

[Musik]
 comment=Raspberry Pi Share
 path=/media/usb-drive
 browseable=Yes
 writeable=Yes
 only guest=no
 create mask=0644
 directory mask=0755
 public=no

Now you have to create a Samba user. I use the user pi again with the same password as above.

sudo smbpasswd -a pi

After a restart the Samba service with

sudo service smbd restart

you can mount the network drive on your PC. When logging in, enter the user that has just been created. Now you can easily copy the music collection to the hard disk of the Squeezebox server.

Logitech Media Server

Now comes the actual server software. I do not use the nighlty packages, but stay on the stable branch. For the Raspberry you have to download the software for arm architecture. Currently it is the version 8.2.0.

wget https://downloads.slimdevices.com/LogitechMediaServer_v8.2.0/logitechmediaserver_8.2.0_arm.deb

The installation of the package and some libraries for encoding is done with

sudo apt-get --fix-broken install libio-socket-ssl-perl
sudo dpkg -i logitechmediaserver_8.2.0_arm.deb
sudo apt-get install -y libsox-fmt-all libflac-dev libfaad2

That is all. The server is now accessible under port 9000 with the respective IP address. With me this is

http://192.168.0.123:9000/

A setup wizard then opens in the browser, with which the most important basic settings of the Logitech Media Server can be made. After the setup is complete, the actual start page appears.
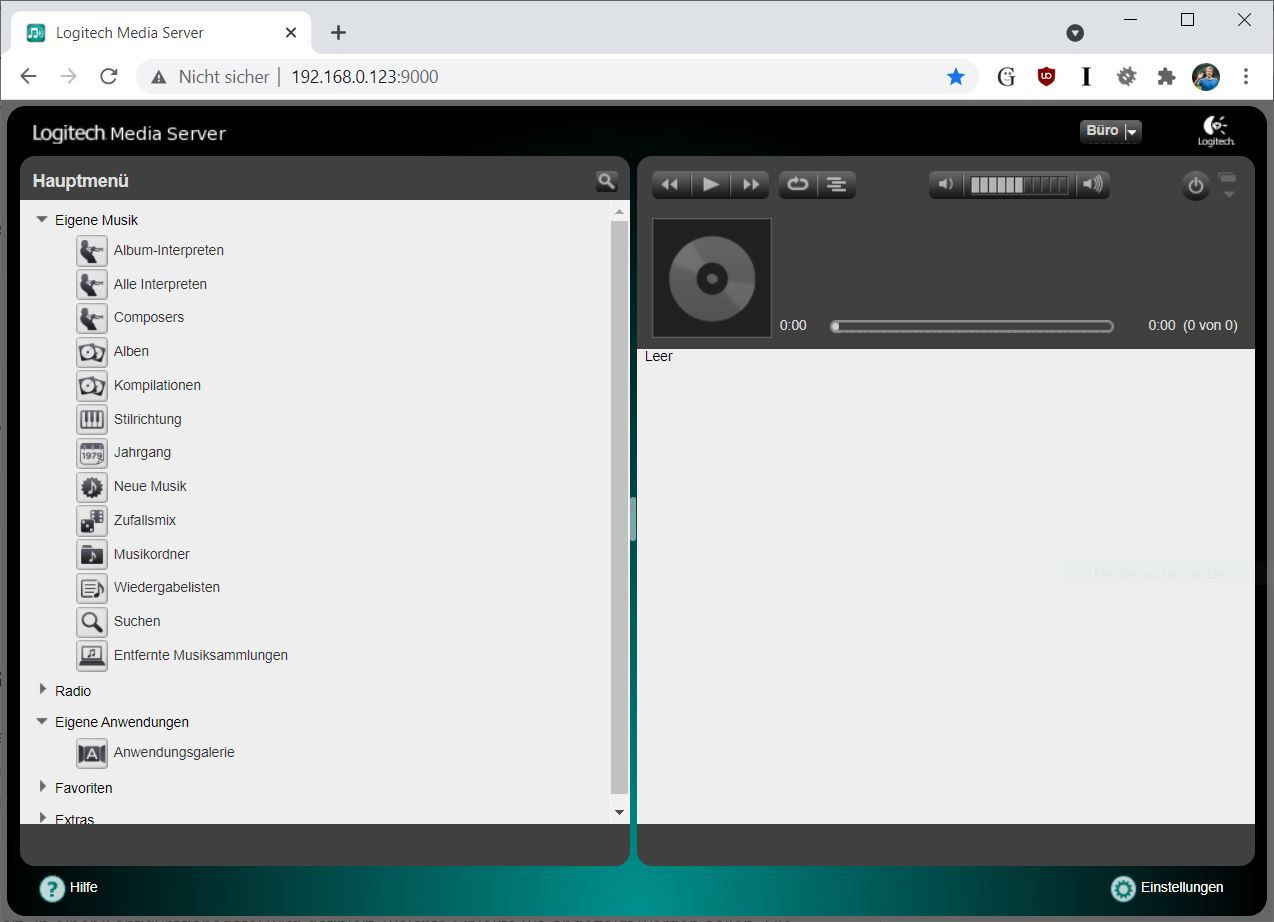
Logitech Media Server

However, there is still a small problem. After a reboot of the Raspberry the server would not start anymore. This is because the /var/logs path above has been moved to a temporary directory. When installing the server package, a subfolder squeezeboxserver was created in the logs directory. Since all changes are only present in RAM, this directory consequently no longer exists after the reboot. Actually, services should automatically create the necessary directories at startup, but Logitech Media Server seems to have a problem with this. Therefore this directory has to be created when starting the service. To do this, edit the startup script with

sudo nano /etc/init.d/logitechmediaserver

and insert the bold marked part:

# Read config file if it is present.
if [ -r /etc/default/$NEWNAME ]; then
        . /etc/default/$NEWNAME
elif [ -r /etc/default/$NAME ]; then
        . /etc/default/$NAME
fi

# Create Logfiles directory
if [ ! -d /var/log/$NAME ]; then
  mkdir /var/log/$NAME/
  chown squeezeboxserver:nogroup /var/log/$NAME/
fi

For this change to take effect, the command

sudo systemctl daemon-reload

must be executed. Now the Squeezebox server will boot correctly even after a reboot.

Set up system monitor

What is still missing is a small program to monitor the system and show the most important data on the display. For this purpose there is a small but versatile system monitor called Conky. The package is simply installed with

sudo apt-get install conky

A configuration file defines which objects should be displayed where. The configuration is done with

nano .config/.conkyrc

and then copy the following content into it:

conky.config = {
    alignment = 'top_left',
    double_buffer = true,
    background = false,
    border_width = 0,
    cpu_avg_samples = 2,
    default_color = 'white',
    default_outline_color = 'white',
    default_shade_color = 'white',
    draw_borders = false,
    draw_graph_borders = true,
    draw_outline = false,
    draw_shades = false,
    use_xft = true,
    font = 'LiberationMono:bold:size=9',
    gap_x = 0,
    gap_y = 0,
    minimum_width = 315,
    maximum_width = 320,
    minimum_height = 240,
    maximum_height = 240,
    net_avg_samples = 2,
    no_buffers = true,
    out_to_console = false,
    out_to_stderr = false,
    extra_newline = false,
    own_window = true,
    own_window_class = 'Conky',
    own_window_type = 'desktop',
    stippled_borders = 0,
    update_interval = 1.0,
    uppercase = false,
    use_spacer = 'none',
    show_graph_scale = false,
    show_graph_range = false
}

conky.text = [[
${color grey}Time: $color${time %a %d. %b %k:%M}  ${color grey}Uptime: $color$uptime
${color grey}CPU: $color$freq MHz    ${color grey}GPU: $color$freq_g GHz
${color grey}Temperature: $color$acpitemp °C
${color grey}CPU Usage:$color $cpu% ${cpubar 6}
${color grey}RAM Usage:$color $mem/$memmax - $memperc% ${membar 6}
${color grey}Networking:  Up: $color${upspeed wlan0}${color grey} - Down: $color${downspeed wlan0}

${color grey}File systems:
${color grey} SD Card $color${fs_used /}/${fs_size /} ${fs_bar 6 /}
${color grey} Disk    $color${fs_used /media/usb-drive}/${fs_size /media/usb-drive} ${fs_bar 6 /media/usb-drive}

${color grey}Name                PID     CPU%    MEM%
${color lightgrey} ${top name 1}   ${top pid 1}  ${top cpu 1}  ${top mem 1}
${color lightgrey} ${top name 2}   ${top pid 2}  ${top cpu 2}  ${top mem 2}
${color lightgrey} ${top name 3}   ${top pid 3}  ${top cpu 3}  ${top mem 3}
${color lightgrey} ${top name 4}   ${top pid 4}  ${top cpu 4}  ${top mem 4}
]]

In order to start Conky automatically after booting, a corresponding file must be created with

mkdir -p .config/autostart
nano .config/autostart/conky.desktop

and insert the following content:

[Desktop Entry]
Type=Application
Name=Conky
Comment=Conky starten
Exec=/usr/bin/conky -b -c /home/pi/.config/.conkyrc

To deactivate the screensaver, a file is created again with the commands

mkdir -p .config/lxsession/LXDE-pi
nano .config/lxsession/LXDE-pi/autostart

and this content is inserted:

@xset s 0 0
@xset s noblank
@xset s noexpose
@xset dpms 0 0 0

What is still disturbing is the mouse pointer in the middle of the display. This can be changed in the file

sudo nano /etc/lightdm/lightdm.conf

For this you have to find the line

#xserver-command=X

and change it as follows:

xserver-command=X -nocursor

Finally, the Setup Wizard is deactivated:

sudo rm /etc/xdg/autostart/piwiz.desktop


After a final reboot it should look like this. The display is of course pure gimmick and not necessary for the operation of the Squeezebox server. But I like to know how my server is doing :)
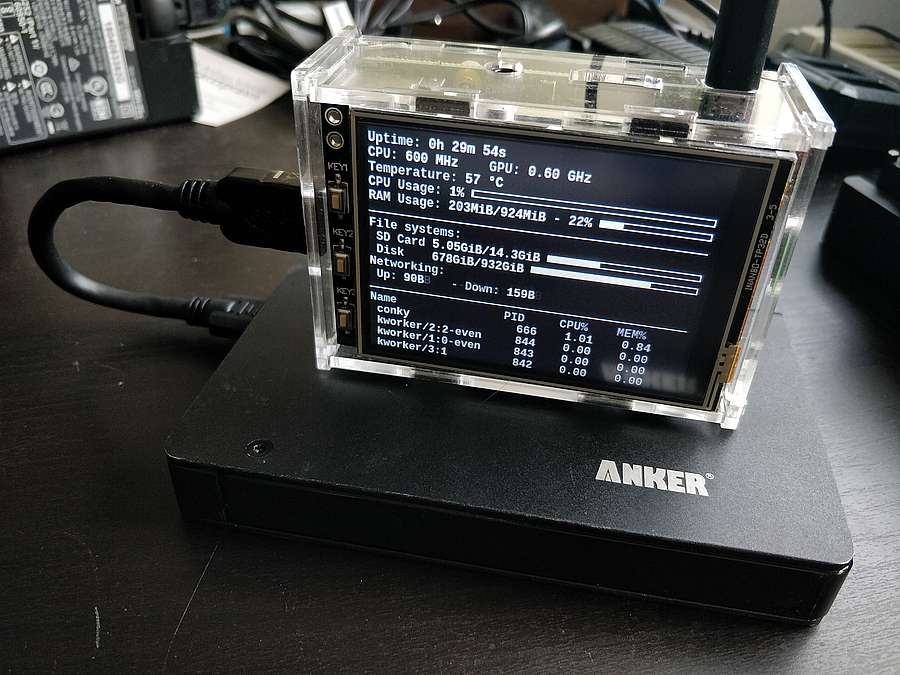
Logitech Media Server mit Raspberry Pi 3B+

The Logitech Media Server is now installed and ready to go. As written above, the system has been running for a few years now without any problems. Maybe I will replace the hard drive with an SSD at some point, but that's not urgent. But regular backups of the hard disk are very important! There is a lot of work in my music collection and I would not like to start from scratch.

If anything in the instructions is unclear or an error has crept in, just leave me a message.

Remove this message? Replies to it will not be removed.
Remove this attachment?
42 Messages
Tobi
Hallo,
erstmal vielen Dank für die tolle Anleitung!
Jetzt kann ich meine beiden Squeezeboxen wieder nutzen.
Die Installation und Einrichtung (inkl. Update des Servers) hat problemlos geklappt.
Ich habe aber folgendes Problem:
Wenn ich einen Radiosender über TuneIn auswähle kommt zwar immer die Werbeansprache von TuneIn aber der Radiosender startet danach nicht.
Machmal hilft es die Squeezebox neu zu starten und machmal den Raspberry.
Kennt das Problem einer von euch bzw. wie kann ich dieses Problem abstellen?
MFG
Harald
Hallo Tobi,

Ich könnte mir vorstellen, dass das ein Problem des TuneIn Plugins ist. Gibt es da irgendwelche Einstellungen?
Ich verwende den Plugin nicht mehr, sondern habe mir einfach direkt die Streaming URLs meiner Lieblingssender gespeichert. Das funktioniert wunderbar und die Werbung gibt es auch nicht mehr,

Aber sonst weiß ich leider keine Lösung... Vielleicht den Plugin deinstallieren und dann wieder neu installieren?

LG Harald
Harry
Bei mir ging es ebenfalls nicht auf anhieb.

Ich habe allerdings noch einen RPi 1 Modell 2011.12 im Einsatz.
Für die Verteilung des Radios reicht es.

Ich musste folgendes ausführen

sudo apt-get --fix-broken install libio-socket-ssl-perl //funktioniert
sudo dpkg -i logitechmediaserver_8.2.0_arm.deb //funktioniert
sudo apt-get install -y libsox-fmt-all libflac-dev libfaad2 //Fehler

sudo su
apt --fix-broken install
sudo apt-get install libcrypt-openssl-rsa-perl
anschliessend sudo apt-get install -y libsox-fmt-all libflac-dev libfaad2

Server läuft!

Mein Setup ist allerdings auch sehr simpel, die Squeezeboxen werden nur für die Wiedergabe von Internetradio verwendet.

Vielleicht hilft es dem ein oder anderen ja.
Stefan
Ich hatte ähnliche Probleme mit dem RPi 3+ und v8.2.0.
Der Media-Server war zwar installiert, jedoch wurde der Dienst gleich wieder beendet. (systemctl status logitechmediaserver)
Auch manuell neu starten (systemctl restart logitechmediaserver) half nichts.

Ich habe dann auch mal das hier versucht:

apt --fix-broken install
sudo apt-get install libcrypt-openssl-rsa-perl
anschliessend sudo apt-get install -y libsox-fmt-all libflac-dev libfaad2

Danach auf 8.5.1 upgegradet und der Server lief.
8.5.1 hatte sich ohne vorherige Installation von 8.2.0 nicht fehlerfrei installieren lassen
Enno Klatt
Danke für die Anleitung. Ich habe alternativ den piCorePlayer installiert.
Ich kann an der Sqeezebox unter Einstellungen den Player hier piCorePlayer auswählen.
Dann kann ich einen Sender auswählen z.B. NDR. Das Problem der Ton kommt aus dem Lautsprecher am RPI und nicht aus der Squeezebox. Warum? Ich steuere über die Squeezebox den Media Server LMS, aber der Ton kommt woanders heraus?
Jürgen
Eine sehr gute Anleitung - nur leider funktioniert es bei mir nicht :-(
Ich habe einen 3B Rev. 1.2
Dass ich WLAN nicht zum Laufen bekommen (soft-blocked) ist zweitrangig. Aber der Mediaserver funktioniert auch nicht. Ich habe 8.3.1 installiert, also die aktuelle Version.

pi@LogitecMediaServer:~ $ systemctl status logitechmediaserver
○ logitechmediaserver.service - Logitech Media Server
Loaded: loaded (/lib/systemd/system/logitechmediaserver.service; enabled; preset: enabled)
Active: inactive (dead) since Tue 2023-11-14 13:32:46 CET; 3min 0s ago
Duration: 1.437s
Process: 701 ExecStart=/usr/sbin/squeezeboxserver --prefsdir $PREFSDIR --logdir $LOGDIR --cachedir $CACHEDIR --charset $CHARSET $SLIMOPTIONS (code=exited, status=0/SUCCESS)
Main PID: 701 (code=exited, status=0/SUCCESS)
CPU: 570ms

Nov 14 13:32:46 LogitecMediaServer squeezeboxserver[701]: If you're running some unsupported Linux/Unix platform, please use the buildme.sh
Nov 14 13:32:46 LogitecMediaServer squeezeboxserver[701]: script located here:
Nov 14 13:32:46 LogitecMediaServer squeezeboxserver[701]: https://github.com/Logitech/slimserver-vendor/tree/public/8.3/CPAN
Nov 14 13:32:46 LogitecMediaServer squeezeboxserver[701]: If 8.3 is outdated by the time you read this, Replace "8.3" with the major version
Nov 14 13:32:46 LogitecMediaServer squeezeboxserver[701]: You should never need to do this if you're on Windows or Mac OSX. If the installers
Nov 14 13:32:46 LogitecMediaServer squeezeboxserver[701]: don't work for you, ask for help and/or report a bug.
Nov 14 13:32:46 LogitecMediaServer squeezeboxserver[701]: *******
Nov 14 13:32:46 LogitecMediaServer squeezeboxserver[701]:
Nov 14 13:32:46 LogitecMediaServer squeezeboxserver[701]: Exiting..
Nov 14 13:32:46 LogitecMediaServer systemd[1]: logitechmediaserver.service: Deactivated successfully.

Ich habe schon gegockelt, aber nichts gefunden, was mir weiterhilft. Schade. Ob ich hier noch einen Tipp bekommen kann??!?
Harald
Hallo Jürgen,

schwer zu sagen, was da los sein könnte. Hast du schon mal exakt die gleichen Versionen wie im Artikel (Debian Buster und LMS 8.2) versucht?

LG Harald
Duri Campell
Hallo Harald,
eine tolle Anleitung, ich hab jetzt meine Server auf LMS 8.2.0 laufen auf dem raspi 4.
Nun kann ich wieder meinen Squeezebox Touch und eine ältere Squeezebox, welche ich umgebaut und in eine B&O-anlage als Tape ersatz eingebaut habe, wieder laufen lassen.

Eine Frage hätte ich noch. wie kann ich das LMS auf eine neuere Version updaten?

Lieber Gruss D
Harald
Hallo Duri,

Das freut mich zu hören :-)
Wenn du im GUI vom LMS auf Einstellungen gehst und dort dann auf Erweitert, dann solltest du so ein Dropdown Menu sehen, wo es unter anderem den Punkt Softwareaktualisierung gibt. Mit dem kann man prüfen, ob es eine neue Version gibt. Wenn ja, wird sie gleich heruntergeladen. Installieren muss man sie aber selber. Das wird dort aber ganz genau beschrieben. Hat bei mir bis jetzt immer funktioniert.

Liebe Grüße
Harald
Peter Borst
Thank you for this excellent guide. I followed it step by step and now I have LMS 8.3.0 perfectly running on a Pi 4 (4GB). I used Raspberry OS Lite (I don't need a display) and maybe that is why libio-socket-ssl-perl would not install (al kinds of whining about missing dependencies). Solved it with: sudo apt-get -o Dpkg::Options::="--force-overwrite" install --fix-broken
Michael
Hallo Harald, erstmal Danke für die super Anleitung...
Ich bin auch schon jahrelang Squeezebox Fan und im Moment läuft der Server auch bei mir auf einem Zyxel NAS
aber genau wie Du dachte ich mir nur wegen der Musik muss das Teil nicht die ganze Zeit laufen... ausserdem gab es immer wiedermal Probleme mit der Zuverlässigkeit.
Jetzt bin ich mit deiner Anleitung super durch die ganze Installation usw gekommen, aber leider kann ich nicht über einen Browser auf den Port: IP-Adresse:9000 zugreifen... "Hat die Verbindung abgelehnt" kommt als Fehler
Wäre super wenn Du mir helfen könntest...
Danke
Michael
Harald
Hallo Michael,

Was steht denn im Logfile? Das solltest du unter /var/log/squeezeboxserver/server.log finden. Vielleicht kann man da ein Problem beim Starten erkennen.

LG Harald
Michael
Hallo Harald,
ich habe versucht mit putty das logfile zu öffen.
Im ersten Versuch kam: Datei oder Verzeichnis nicht gefunden
Also dachte ich, da ist der Fehler! Ich habe den logitechserver nicht richtig installiert.
Also nochmal neu installiert...
Dann kam folgende Meldung: /var/log/squeezeboxserver/server.log: keine Berechtigung
Harald
Sehr seltsam. Versuche mal

ls -asl /var/log/squeezeboxserver/

Das Ergebnis sollte etwa so aussehen:

0 drwxr-xr-x 2 squeezeboxserver nogroup 100 Aug 6 13:19 .
0 drwxr-xr-x 6 root root 680 Aug 20 00:00 ..
0 -rw-r--r-- 1 squeezeboxserver nogroup 0 Aug 3 10:40 perfmon.log
12 -rw-r--r-- 1 squeezeboxserver nogroup 9100 Aug 6 13:20 scanner.log
20 -rw-r--r-- 1 squeezeboxserver nogroup 16668 Aug 20 05:25 server.log

Das Logfile solltest du mit

sudo more /var/log/squeezeboxserver/server.log

ansehen können.
Michael
Danke für deine schnelle Antwort...

0 drwxr-xr-x 2 squeezeboxserver nogroup 60 20. Aug 09:11
0 drwxr-xr-x 6 root root 400 20. Aug 09:11
52 -rw-r--r-- 1 squeezeboxserver squeeszeboxserver 53211 20. Aug 10:25 server.log

mit sudo more ... kam:

2022-08-20 09:11:30 squeezeboxserver_safe started.
2022-08-20 09:11:35 Logitech Media Server died. Restarting

Das hat sich dann so wiederholt


LG
Michael

Michael
Hallo Harald,
ich habe das Problem gelöst... Erstmal hatte sich ein Fehler eingeschlichen: ich hatte bei der Zeile
chown squeezeboxserver:nogroup /var/log/$NAME/
versehentlich ein § statt ein $ eingegeben...
Das hat aber mein Problem auch nicht gelöst immer wieder kam:
Logitech Media Server died. Restarting

Erst nachdem ich Version 8.2.0 heruntergeladen und installiert hatte lief alles und ich konnte mich mit der Weboberfläche verbinden

Danke für Deine Mühe

LG

Michael
Harald
Hallo Michael,

Super dass es jetzt läuft. Was mich noch interessieren würde:

- Welchen Raspberry hast du verwendet?
- Welche Betriebssystem Version hast du installiert?

Vielleicht sollte ich die Anleitung dann etwas aktualisieren....

LG Harald
Michael
Hallo Harald,

kein Problem:

Raspberry 3 B+
Raspberry Pi OS Full (32bit) aktuellste Version vom Raspberry Pi Imager v1.7.2

LG

Michael
Daniel Koch
Hallo Harald
ich habe auch wohl seit einem Jahrzehnt die Squeezeboxen im Einsatz und durfte u.a. auch von deinem Wissen/Apps profitieren. Danke!
Seit ich allerdings den Server Version 8 zusammen mit dem Spotify-App betreibe hat mein Synology NAS ziemlich Probleme: Durch notwendige Updates von Pearl musste ich auch das Betriebssystem modernisieren, die Performance des alten NAS reicht nun offensichtlich nicht mehr: das neue Betriebsystem löst alle paar Stunden irgendwelche Jobs aus, die zur Nichterreichbarkeit des Squeezeboxservers führen.

Sobald die Rasberry Pis wieder besser verfügbar sind möchte ich deshalb einen dezidierten Server für die Sqeezeboxen aufbauen. Reicht die Performance auch, wenn ich neben der Musiksammlung und Radio auch Spotify über die Squezzebox betreiben will?

beste Grüsse
Daniel
Harald
Hallo Daniel,

Dein Setup/Problem entspricht ziemlich genau meiner Situation von früher. Damals hatte ich auch den Squeezebox Server auf dem NAS und bei jedem Update die Ungewissheit, ob noch alles läuft...

Auch ich höre sehr viel Musik über Spotify. Der Raspberry (Bei mir ein 3B+) hat damit keinerlei Probleme. Im Grunde erzeugt der Plugin kaum Last auf dem Raspberry.

Ich würde die Anleitung ja gern für den Raspberry 4 aktualisieren, aber bei den wahnwitzigen Preisen im Moment muss das leider noch warten....

Liebe Grüße
Harald
daniel Koch
Hallo Harald

ich kenne mich nur mit Arduinos aus, mit den Raspberrys habe ich keine Erfahrung. Erwartest du, dass das Aufsetzen des Squezzebox-Servers auf einer Pi 4 sich von einem Pi 3 unterscheidet? Ich habe gesehen, dass auch die Pi 3 mit unterschiedlichen Prozessoren geliefert werden, muss ich da mit Abweichungen zu deiner Anleitung rechnen?

Gruss Daniel
Harald
Hallo Daniel,

Ich kann es leider nicht wirklich sagen. Aber schau mal weiter unten, da hat Jiri Pluhar geschrieben. Er hat es auf dem Pi 4 installiert und nach anfänglichen Problemen ging es dann mit dem Squeezebox Server Version 8.2.0. Also statt dem Link in der Anleitung einfach den nehmen:
https://downloads.slimdevices.com/LogitechMediaServer_v8.2.0/logitechmediaserver_8.2.0_arm.deb

Grüße Harald
A.Riedel
Hallo Harald, du scheinst dich ja mit den squeezeboxen wirklich super auszukennen.
Tolle Anleitung!!
Meine Squeezeboxen (Touch, und Radio) hängen sich manchmal auf bzw spielen kein Radio mehr.
Ich glaube, dass das an der Abhängigkeit vom Logitech Server liegt. Wenn ich meinen eigenen Server (aus deiner Anleitung) betreibe, wird das Radio bestimmt fehlerfrei laufen, oder?

Kann ich auch einen neueren Raspberry nutzen? Passt das dann alles noch mit deiner Anleitung? Hardware, Software....?

Viele Grüße A.Riedel
Harald
Hallo Andre,

Danke für deine Nachricht! Was für einen Squeezebox Server verwendest du denn bisher? Ich hatte früher ein Synology NAS als Server und hatte da auch öfter Probleme. Mit dem Raspberry läuft es aber problemlos. Ob es mit einem Pi 4 genauso funktioniert, kann ich leider nicht sagen, da ich keinen habe und bei den Preisen auch sicher keinen kaufen werde ;)

Hast du schon mal in den Logfiles nachgesehen?

Liebe Grüße
Harald
Andre
Hi,

ich nutze alles über mysqueezebox.com

mich stört halt, dass das Radio manchmal ausfällt.

Wäre es ggf. möglich das Radio lokal direkt auf der Touch laufen zu lassen? Die besitzt doch einen eigenen Server. Ich möchte nur Radio hören.
Harald
Wenn es nur um das Radio geht, würde ich auf jeden Fall erst mal den internen Server probieren. Er gilt zwar als nicht besonders leistungsstark, aber dafür sollte es schon reichen...
Jiri Pluhar
Hello,
I'm trying to install on x64 version of Raspbian on RPi 4 8GB RAM.
I am installing only Logitech Media Server (8.1.1), I have done all the above commands and it did not report any error during installation.
In my log file it keeps listing "Logitech Media Server died. Restarting", can someone please advise me?
Best regards Jiri
Jiri Pluhar
I am attaching a status printout:

sudo /etc/init.d/logitechmediaserver status -l
● logitechmediaserver.service - LSB: Startup script for the Logitech Media Server
Loaded: loaded (/etc/init.d/logitechmediaserver; generated)
Active: active (running) since Sat 2022-03-26 14:18:05 CET; 32min ago
Docs: man:systemd-sysv-generator(8)
Tasks: 2 (limit: 8985)
CPU: 1min 37.866s
CGroup: /system.slice/logitechmediaserver.service
├─2953 /bin/bash /usr/sbin/squeezeboxserver_safe /usr/sbin/squeezeboxserver --prefsdir /var/lib/squeezeboxserver/prefs --logdir /var/log/squeezeboxserver/ --cachedir /var/lib/squeezeboxserver/cache --charset=utf8
└─5199 sleep 5

bře 26 14:18:05 raspberrypi systemd[1]: Starting LSB: Startup script for the Logitech Media Server...
bře 26 14:18:05 raspberrypi logitechmediaserver[2946]: Making sure that Logitech Media Server is not running first:
bře 26 14:18:05 raspberrypi logitechmediaserver[2950]: No process in pidfile '/var/run/logitechmediaserver.pid' found running; none killed.
bře 26 14:18:05 raspberrypi logitechmediaserver[2946]: Starting Logitech Media Server.
bře 26 14:18:05 raspberrypi systemd[1]: Started LSB: Startup script for the Logitech Media Server.
Jiri Pluhar
Sorry for the delay, I updated the LMS to version 8.2.0 and the server is up and running.
Jiri Pluhar
Thank you very much for the excellent tutorial, I am not familiar with systems like linux and without this description I would not have started the LMS.
Thank you very much.
Jiri.
Harald
Hello Jiri,

Thanks a lot for your comment! I am very happy to read that you have made it work :-)
Chris Renfer
Guten Tag Harald, ich bin eben über deine Page "gestolpert", auf der Suche nach einer Lösung, wie ich meinen Squeezebox "Park" (wir haben etliche Classic / Duet / Transporter / Mini) im Einsatz am Leben erhalten kann - ich bin ein grosser Squeeze Fan und habe die Teile um die halbe Welt gezügelt über die letzten 20 Jahre (ich wohne mittlerweilen in Dubai...) :-)
Momentan betriebe ich den Logitech Media Server auf meiner Synology DS412+, was ganz gut läuft, solange man das Perl Module nicht updated.... neben den Squeezes läuft auch meine Synology langsam End-of-Life und ich will hier upgraden. Das hat (wahrscheinlich) die Konsequenz, dass das Perl Modul nicht mehr downgraded werden kann, und der Logitech Media-Server wird in der Folge nicht mehr laufen...
Ich habe mir kürzlich einen Rasperry PI Server zugelegt um ein bisschen damit rumzuspielen (kenne mich hier aktuell ziemlich schwach aus...). Die Idee, den Logitech Media Server da drauf zu packen, macht viel Sinn und hat Charme - so kann das Ganze "Problem" mit Perl von der Synology isoliert werden und gut ist.

Nun meine Frage: ich habe eine sehr grosse Music Library mit ca 20'000 Titeln und ich möchte die Library eigentlich auf der Synology RAID-5 lassen. Gibt es eine Möglichkeit, deine spannende Lösung so zu modifizieren, dass ich den Rasperry-Pi als Streaming Server verwenden, aber anstelle eines USB-Disk meine Synology als Storage erhalten kann? Ich denke an einen Shared Folder Zugriff via NFS / FTP / o.ä.? Das wäre das Ultimo!

Wie gesagt, ich bin ein Pi-Newcomer und bin sehr dankbar, wenn ich dein Wissen etwas anzapfen darf. Besten Dank und frohe Weihnachten aus der Wüste :-)
Harald
Hallo Chris,

Das Einbinden eines NFS Shares ist gar kein Problem für den Raspberry. Hier findest du zum Beispiel eine gute Anleitung:

https://jsx.red/synology-nas-mit-dem-raspberry-verbinden/

Mein Squeezebox Server ist früher auch auf einem Synology gelaufen. Da ich das NAS aber eigentlich nur als Backup Server verwende, ist es die meiste Zeit im Tiefschlaf. Das hat einerseits beim Wecker Probleme bereitet und andererseits fand ich es nicht sehr effizient, wenn nur zum Musik Hören das ganze NAS inklusive aller Platten laufen muss. Daher die externe Disk am Raspberry :-)

Und da sich die Musik auch nicht so oft ändert, reicht mir ein gelegentliches Backup völlig aus. Bei mir sind es knapp über 19000 Titel und dafür reicht die Performance der externen Platte völlig aus...

Liebe Grüße aus Wien und frohe Weihnachten,
Harald
Chris Renfer
Herzlichen Dank für den Link, ich schau mir das mal an und würde mich wieder melden, wenn ich "anstehe" ;-)
Lieb Grüsse - Chris
Churcher65
Hallo, ich wollte natürlich Harald für seine tolle Anleitung danken (Toby, nix für ungut ;)).
Churcher65
Hallo Toby, vielen Dank für deine tolle Anleitung. Ich hatte lediglich Probleme mit dem Mounten der USB-Platte. Nach dem Eintragen der UUID in die /etc/fstab bootete der Raspberry nicht mehr. Ich habe dann keine exfat formatierte Platte gemountet sondern eine ntfs formatierte mit folgendem Befehl: "UUID=74EA618724897ACE /media/usb ntfs auto,nofail,sync,users,rw 0 0".
Eine Frage hätte ich dennoch: Kann man eine neuere LMS Version einfach runterladen und drüber installieren?
Harald
Hallo Churcher65,

Vielen Dank für dein nettes Feedback! Kannst du auf die NTFS Platte auch schreiben? Ich weiß nicht wie der aktuelle Stand im Kernel ist, früher war der default Treiber readonly und man musste den NTFS-3G Treiber für vollen Zugriff installieren...

Hast du vielleicht in einem Logfile einen Hinweis gefunden, warum er nicht bootet?

Wegen dem Update. Der LMS sollte eine Benachrichtigung anzeigen, wenn es eine neue Version gibt. Dort steht dann auch wie sie installiert wird. Und das ist eigentlich genau das was du schreibst, nur dass der LMS die Version schon heruntergeladen hat. Da es ein ganz normales Debian Package ist, kannst du es einfach installieren und die alte Version wird dadurch ersetzt.

LG Harald:-)
Toby
Vielen lieben Dank, für diese tolle und ausführliche Anleitung. Ich habe meinen LMS Server ohne Display gemacht. Hat alles super geklappt.
Als Endgeräte benutze ich mehrer Squeezerbox Radios. Wichtig, diese müssen nachdem der eigene Server läuft, einmal auf Werkseinstellung gesetzt werden. (Einfaches Update vom Raspberry hat nicht funktioniert.)

Auf dieser Seite werde ich nun treuer Leser. Nochmal 1000 Danke :)
Harald
Hallo Toby!

Freut mich sehr dass du mit meiner Anleitung etwas anfangen konntest :-)

Welches Problem hattest du denn mit den Squeezebox Radios, dass du sie auf Werkseinstellungen zurücksetzen musstest?
Toby
Das genaue Problem kannte ich leider nicht.
Der Server lief, trozdem wollten die Sq.Radios sich nicht mit dem Server verbinden. 1. Versuch Neustart der Radios, 2. Versuch ein Update der Radios, in dem Menü wurde der Raspberry Server sogar angezeigt, trozdem nichts.
Aber die Radios auf Werkseinstellung zu setzen ist ja kein Problem, Wecker und usw. ist ja alles schnell wieder eingestellt.
Bis jetzt habe ich (die letzten 10 Jahre) ein LMS über einen qnap betrieben.
Harald
Hauptsache es funktioniert jetzt:-)

Bei mir ist der Squeezebox Server früher auch auf einem Synology NAS gelaufen. Aber ich wollte dann nicht mehr, dass das ganze NAS nur wegen Musik und Wecker laufen muss...
Alexandra Kreuzer
Sehr gute Anleitung, vielleicht schaffe ich es auch eines Tages, einen Server zu installieren.

Nachricht hinzufügen


Captcha Code

Captcha Code